
A chord progression can be the foundation for a full EDM song. Such a progression can be a guideline for one or more musical parts like a melody, but we can also use it as a musical part on its own. There is much theory about chord progressions, but the most common in EDM is using only the basics of that theory, which is the focus of this post.
How to make a basic chord progression for EDM songs? A chord progression is a sequence of musical chords. Therefore, when we place at least two chords behind each other, which can be random, we have a chord progression, and we can call it basic. However, it doesn’t mean that such a progression sounds good, but that is opinion-based.
After this introduction, this post goes more in-depth about how we can make basic chord progressions for our songs.
The Meaning of a Chord Progression
A chord progression is a sequence of musical chords. Each of these chords consists of three or more notes, and we can hear these notes typically simultaneously played together.
Chord progressions come in many forms, and there is way too much information about this topic. However, it is good to know that most of such progressions are in a major key or a minor key, and in EDM are the minor ones the most common.

Making a Triad Chord
This section explains how we can make a triad chord, which is the most basic chord form and the most commonly used form. Furthermore, every triad chord consists of three notes.
The first step by which we can make a chord is to choose one of the seven notes from a key. In this case, we use this note as the root note of our chord. Most of the time, the root note is the bottom note of the chord, but not always since the chord can be inverted.
For example, from the key G minor (G, A, B♭, C, D, E♭, and F), we can pick B♭ as the root.
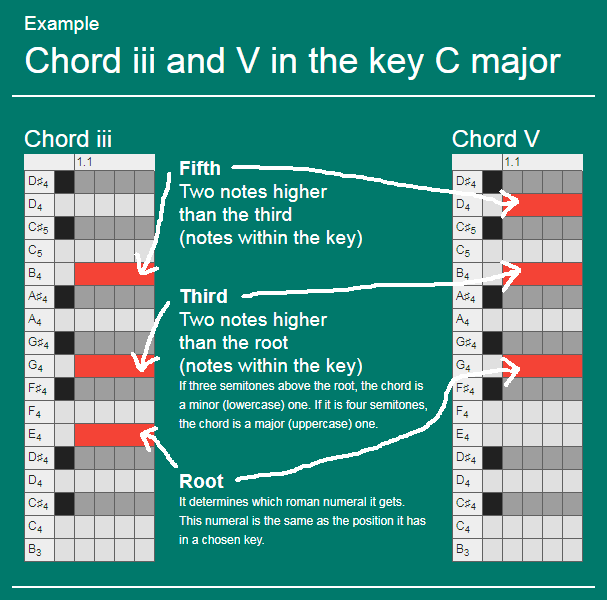
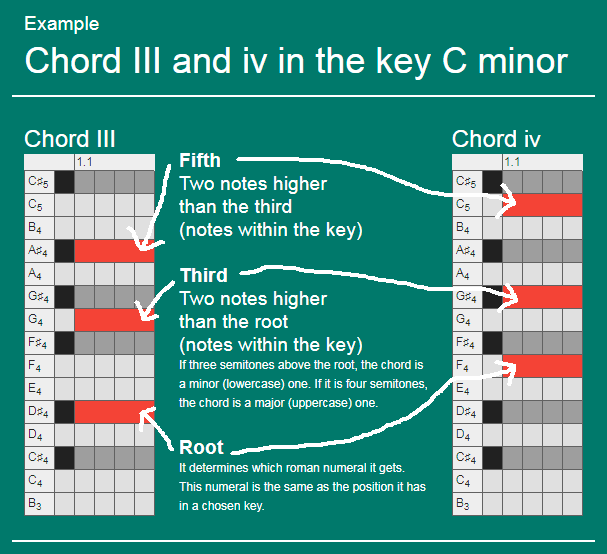
The second step is to pick the second note for our chord, which we call the third. From the same key as we have chosen our root, we pick the note that is two notes higher as our chosen root in that key. So, the third in a chord is always three or four semitones above the root.
For example, from the key G minor, we have B♭ as the root and D as the third.
The third step is to pick the third note for our chord, which we call the fifth (does not have to be a perfect fifth). From the same key as we have chosen our root and third, we pick the note that is two notes higher as our chosen third in that key. With our added fifth, our chord is complete.
For example, from the key G minor, we have B♭ as the root, D as the third, and F as the fifth.
Major or Minor Chord
The triad chord we can make with the previous three steps can be a major or a minor chord. Knowing if a chord is a minor or major chord is useful in the next section, “Chords in Roman Numeral Notation.”
If our chord the third is three semitones above the root, then we call the chord a minor chord. Alternatively, if our chord the third is four semitones above the root, then we call the chord a major chord.
Above the Seventh Note of a Key
When we are making a chord, the third or the fifth that we may want to pick can be higher than the seventh note of the key. We may want to pick the note eight or higher from a key, which we can’t since there are only seven notes in a key.
When we use a musical key, then we use this key in multiple octaves. Since we can use every note from a key in multiple octaves, the missing eighth note is the same as the first note, but then an octave above. The missing ninth note is the same as the second note, but then an octave above, and so on.
For example, from the key G minor, if our root is the sixth note E♭, then the third should become the eight note. This eighth note is the same as the first note but an octave higher, which is G.
Chords in Roman Numeral Notation
This section is about the notation of chords, which we can help us when we talk/write about chords.
We can write chords in a roman numeral, and the root of a chord determines which numeral it gets. This numeral is the same as the position the root has in our chosen key.
There is a difference in notation when your chord is a major or a minor chord. When we have a major chord, then we notate the roman numeral in an uppercase. Also, when we have a minor chord, then we notate the roman numeral in a lowercase.
Roman numeral notations can also show that a chord is diminished or augmented. However, we don’t care about augmented chords in this post, since most of the time, they don’t sound right in EDM in the opinion of many people. Furthermore, we notate a diminished chord by adding a small circle in superscript after the roman numeral, for example, iio.
| example chord in G major | roman numeral |
|---|---|
| G, B, D | Ⅰ |
| A, C, E | ⅱ |
| B, D, F♯ | ⅲ |
| C, E, G | Ⅳ |
| D, F♯, A | Ⅴ |
| E, G, B | ⅵ |
| F♯, A, C | ⅶo |
| example chord in G minor | roman numeral |
|---|---|
| G, B♭, D | ⅰ |
| A, C, E♭ | ⅱo |
| B♭, D, F | Ⅲ |
| C, E♭, G | ⅳ |
| D, F, A | Ⅴ |
| E♭, G, B♭ | Ⅵ |
| F, A, C | Ⅶ |
Making a Basic Chord Progression
The best chord progressions are, most of the time, the most simple ones. Therefore, we can make satisfying chord progressions without much theory. We can always make such progressions longer and more complicated, but that does not mean it will make them sound better.
Something to keep in mind is that it is probably impossible to create a unique good sounding chord progression. It is impossible because from the past centuries to now, many people have created many chord progressions. However, we do not need unique chord progressions, but we do need good sounding progressions, which the artist determines.
The following two subsections explain how we can make a basic chord progression with a major key or a minor key. However, those explanations are not the only methods by which we can make chord progressions.
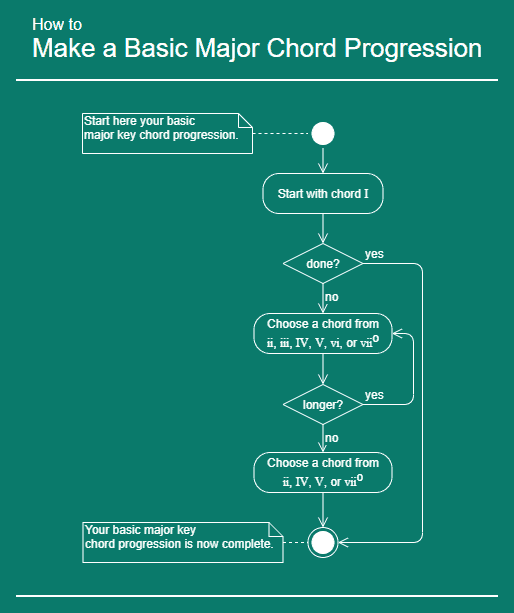
Making a Basic Major Key Chord Progression in Three Steps
We can make a basic major key chord progression in three steps or less, which are:
- First, we make the chord I, which is our starting chord. A chord progression can be only one chord long. If we want a progression with only one chord, then we can skip the next steps.
- Secondly, if we want that our chord progression is two chords long, then we should pick ii, IV, V, or vii0 as our second chord, and we can skip the next step. Alternatively, if we want a progression of at least three chords long, then we should pick iii or vi as our second chord.
- Thirdly, we can add as many chords to our chord progression as we want from these chords: ii, iii, IV, V, vi, or vii0. However, we should not take a chord we already have in our progression, and we should end our progression on an ii, IV, V, or vii0 chord.
An example of a chord progression that we can make with these three steps is I-IV-vi-V.
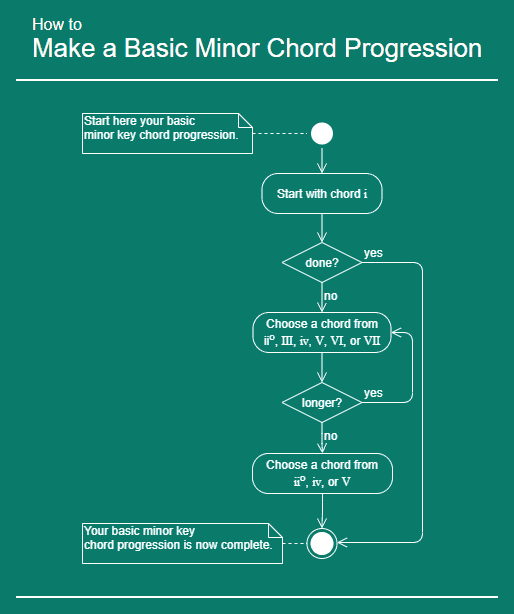
Making a Basic Minor Key Chord Progression in Three Steps
We can make a basic minor key chord progression in three steps or less, which have many similarities with the major key version. These three steps are:
- First, we make the chord “i”, which is our starting chord. A chord progression can be only one chord long. If we want a progression with only one chord, then we can skip the next steps.
- Secondly, if we want that our chord progression is two chords long, then we should pick iio, iv, or V as our second chord, and we can skip the next step. Alternatively, if we want a progression of at least three chords long, then we should pick III, VI, or VII as our second chord.
- Thirdly, we can add as many chords to our chord progression as we want from these chords: iio, III, iv, V, VI, or VII. However, we should not take a chord we already have in our progression, and we should end our progression on an iio, iv, or V chord.
An example of a chord progression that we can make with these three steps is i-III-iv-V.
A Chords Rhythm
Our brains follow the rhythms of basslines easier than those of other higher-pitched instruments, such as those playing chords. Therefore it is, most of the time, a good idea to give the rhythm of chords some extra attention. However, this does not mean that we should make it more complicated.
The most common chord rhythm is probably a chord at every bar (4 beats), with every chord being a whole bar long. A simple rhythm like this can be perfect for a song, but below in this section, we can find some ways about how we can modify such a rhythm. Furthermore, this section first gives a summary of a music note rhythm post.
Music Note Rhythm Post Summary
On this site, there is a blog post about music note rhythms that probably has all the information we need about chord rhythms. A summary of the most important things from that post follows here.
An effective (probably the best) method is to copy a rhythm from other elements, for example, a drum rhythm.
The other way around works too, first make a chord rhythm and then use that rhythm for another element. However, that is out of the scope of this post, since that other element is not chords.
Every rhythm has a length, which is almost always in bars. Moreover, every rhythm length is allowed. However, I only recommend a few possible lengths to use.
The rhythm lengths that I recommend are also by far the most common in EDM, and are:
- 1 bar
- 2 bars
- 4 bars
- 8 bars
- 16 bars
If you don’t count the 1 bar length, then all the lengths listed here are an even number, which makes them hopefully easier to remember.
It is common that rhythms in EDM chords get repeated, which is the case for probably all EDM tracks.
For example, we have a great sounding 4 bar long chord rhythm, but we want a 16 bar rhythm. In this case, we duplicate the 4 bar chords three times, so we get four times a 4 bar chords. Then, when we place the original and the duplicate chords directly behind each other, we get a 16 bar rhythm.
Two Ways to Modify a Chord Rhythm, That Switches a Chord at Every Bar
As mentioned above, the most common chord rhythm is probably a chord at every bar, with every chord being a whole bar long. Here follow two ways by which we can make such a chord rhythm more interesting (does not mean that it becomes better).
The first way is to make some chords a half-beat shorter and some chords a half-beat longer. The most common method to do such half-beat modifications is by following these three steps:
- First, we count the number of chords there are in a rhythm.
- Secondly, we shorten the odd-numbered (like one, three, and five) chords that we have counted (in the previous step) by a half-beat at the end of these chords.
- Thirdly, we start the even-numbered chords a half-beat sooner and make them a half-beat longer.
For example, we have a rhythm that is four chords long, with the chords i-VI-v-iv. In this rhythm, the “i” is three and a half-beat long, and the VI is four and a half-beat long, and the “v” is three and a half-beat long, and the iv four and a half-beat long.
The second way is to split one or multiple chords into multiple parts. When we make those parts smaller, then we can add a rest between parts.
For example, we have a rhythm that is four chords long, with the chords i-VI-v-iv. As an example, we can split the chord “i” like this: 3/4 beat chord, 1/4 beat rest, 3/4 beat chord, 2/4 beat chord, 1/4 beat rest, 3/4 beat chord, and 1/4 beat rest. We can split the other chords in this progression in a similar way.
Combine the Two Ways
We can also combine the two mentioned ways by which we can modify a chord rhythm, that switches a chord at every bar.
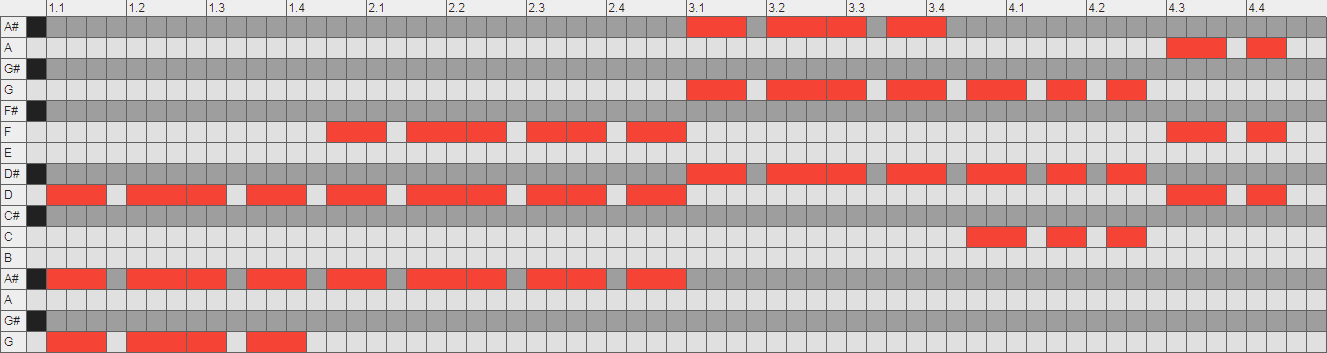
For example, we have the chord progression i-III-VI-iv-v. In this progression, chord “i” is three and a half-beat long, and chord III is four and a half-beat long. Further, chord VI is three and a half-beat long, chord iv is two and a half-beat long, and chord “V” is two beats long.
We can split the chords in the example chord progression into multiple parts, like as visible in this image.
Simple Methods to Modify a Triad Chord
We can modify a chord by changing its notes. By modifying a chord, we change its sound, and new possibilities arise when we use it as a guideline.
By modifying a chord, it doesn’t always mean that we improve it. We should modify chords for a reason, like that it sounds better in a context.
There many ways possible methods by which we can modify a triad chord. However, in my experience, many of those methods make the chord unusable. Therefore, here are only three methods by which we can modify chords in a way that they stay usable:
- If we think that a triad chord is too present, then we can remove ‘the third’ of the chord, by which it becomes less present.
- When we want a triad chord to be broader (wider), then we can remove ‘the third’ of the chord. After that, we can copy the root note of the chord and place the copy an octave above the root note.
- If we want to add more presence to a triad chord, then we can add a fourth note to the chord, which is two notes (three or four semitones) above the fifth.
Here are three examples of the three mentioned methods by which we can modify a triad chord. These examples are in the triad chord iv in the key G minor, which has the notes C, D♯, G.
| less presence | wider | more presence |
|---|---|---|
| C, G | C, G, C | C, D♯, G, A♯ |

Good to Know
There are some things about making chord progressions that can be good to know, but in my opinion, these things are not part of this post. However, I will still mention them here because they can be helpful. These things are:
- Probably every EDM song consists of multiple sections, such as intro, break, build, drop, and outro. Each of these sections can (not a must) have a different chord progression, a different rhythm of the same progression, or a combination of both.
- Some popular and safe choices for minor keys in EDM songs are A, C, E, and G. However, a key in an EDM song doesn’t have to be safe and popular.
- Placing most or all the notes of chords from C3 to C4 in piano key frequencies is common since that sounds good. However, placing most or all notes of chords within these frequencies is not a rule or something like that.
Closing Words
Hopefully, you have learned something about making basic chord progressions.
If you like this post, then you may want to look at some posts in the production part, since this post is also part of it.
When you know someone who likes to know more about making basic chord progressions, then feel free to share this post. Additionally, do you know something about making basic chord progressions that should have been part of this post, but is now not?